A blog to help electrical engineers and students to learn electrical engineering topics. Basic Electrical Engineering, Power Systems, Electrical Machines, tec.. Now special course on MATLAB for Beginners.

Class

Class

Friday, July 22, 2016

Working with Excel files in MATLAB - Part 1


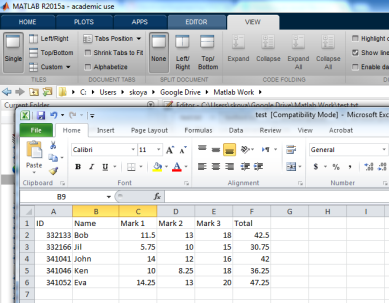
MATLAB have many builtin functions to work with Excel files. In this post, we will discuss some of the common functions to work with Excel files.  It is easy to interact with an excel file using xlswrite and xlsread commands. First we will make an sample excel file test.xlsx which contain grades of students in a class.

xlsread ( ) - Read Microsoft Excel spreadsheet file

The xlsread function reads data from the first worksheet of a Microsoft Excel file and save the numeric data in a array. If the file contains only numeric data the syntax is:
A = xlsread(‘filename’)
The ‘filename’ is a string with full name of the excel file (with path if the file is not in the current folder). The numeric data in the first work sheet of the file will be saved to the variable A. There are optional arguments to set the work sheet and the range to be read.
A= xlsread(‘filename’, ‘worksheet’, ‘range’)
The range is specified in the same way as represented in the excel equations (e.g. C2:F12).
If the file contains nonnumeric data, the syntax is modified as:
[NUM,TXT,RAW]=xlsread(‘filename’, ‘worksheet’, ‘range’)
The dat in the file will be saved as, numeric data in the variable NUM, text data in the variable TXT and the unprocessed data will be save as a cell array RAW. The cell array RAW will contain all the data in the worksheet.

Example:
Consider the file test.xlsx, which contain the grades of students. The numeric data is stored in the range C2:F6.
>> a=xlsread('test.xlsx', 'C2:F6')
a =
   11.5000   13.0000   18.0000   42.5000
    5.7500   10.0000   15.0000   30.7500
   14.0000   12.0000   16.0000   42.0000
   10.0000    8.2500   18.0000   36.2500
   14.2500   13.0000   20.0000   47.2500
To read all the data,
>> [a,b,c]=xlsread('test.xlsx')
a =
   1.0e+05 *
    3.3213       NaN    0.0001    0.0001    0.0002    0.0004
    3.3217       NaN    0.0001    0.0001    0.0001    0.0003
    3.4104       NaN    0.0001    0.0001    0.0002    0.0004
    3.4105       NaN    0.0001    0.0001    0.0002    0.0004
    3.4105       NaN    0.0001    0.0001    0.0002    0.0005

b =
    'ID'    'Name'    'Mark 1'    'Mark 2'    'Mark 3' 'Total'
    ''      'Bob'     ''          ''          ''          ''    
    ''      'Jil'     ''          ''          ''          ''    
    ''      'John'    ''          ''          ''          ''    
    ''      'Ken'     ''          ''          ''          ''    
    ''      'Eva'     ''          ''          ''          ''    

c =
'ID'       'Name'    'Mark 1'     'Mark 2'    'Mark 3' 'Total' 
[332133]    'Bob'     [11.5000]    [  13]    [  18]  [42.5000]
[332166]    'Jil'     [ 5.7500]    [  10]    [  15]  [30.7500]
[341041]    'John'    [     14]    [   12]   [  16]  [     42]
[341046]    'Ken'     [     10]   [8.2500]   [  18]  [36.2500]
[341052]    'Eva'     [14.2500]    [   13]   [  20]  [47.2500]

readtable( ) - Create table from file


readtable function is used to read not only excel files. \it read from different file types and sane as a MATLAB table.
T = readtable(‘filename’) is the basic syntax. There are optional arguments to set the file type and many other attributes based on the type of the file.
Example:

>> T = readtable('test.xlsx')

Warning: Variable names were modified to make them valid MATLAB identifiers.

T =

        ID         Name      Mark1    Mark2    Mark3    Total

    __________    _______    _____    _____    _____    _____

    3.3213e+05    'Bob'       11.5      13     18        42.5

    3.3217e+05    'Jil'       5.75      10     15       30.75

    3.4104e+05    'John'        14      12     16          42

    3.4105e+05    'Ken'         10    8.25     18       36.25

    3.4105e+05    'Eva'      14.25      13     20       47.25

      3.42e+05    'James'     12.5      13     20        45.5

      3.42e+05    'Anna'        12    10.5     16        38.5


Like in the xlsread function, read table also have optional arguments to read a specific worksheet and range. For more details refer Matlab Help.

Friday, July 15, 2016

Working with Text files in MATLAB - Part 2


In part one we discussed about basic functions to deal with text files. Now we will discuss more function to read from and write to different types of text files.

csvwrite( )  - Write comma-separated value file

csvwrite is the basic function in MATLAB to write data to a file as comma-separated values. It has only limited options to write numeric data to the file. The syntax is:
csvwrite(filename, C)
The function writes matrix C into the file as comma-separated values.

Example:
>> csvwrite('csvexample.txt',data)
Write the contents of the variable data to the file csvexample.txt as comma separated values.
If you want to write with more formatting options, you have to use fprinf or dlmwrite functions.

csvread( ) - Import Comma-Separated Data

Like csvwrite function, csvread also is simple function to read a .csv file or range of comma-separated numeric data and save to a matrix. The file must contain only numeric values.
X = csvread('filename')
Other optional arguments are offset and range.
X = csvread('filename', R, C, [range])
Where R and C are the row and column offsets and the range is row and column numbers of left top and right bottom points defined as range = [R1 C1 R2 C2].
Example:
To read the data from the csvexample.txt file we made in the previous example:
>> A=csvread('csvexample.txt')
A =
     1     2     3     4
     5     6     7     8
     9    10    11    12

dlmwrite( ) - Write matrix to ASCII-delimited file

dlmwrite function also is used to write the data in to a file. But it has more options than the csvwrite function. The syntax is:
dlmwrite('filename', C, 'delimiter', ’value’, R, C)
The function writes the contents of matrix C in to the file.  The delimiter is used to separate the values. The default delimiter is ‘,’ (comma). You can us other values also as the delimiter. The offset values R and C are optional.
There are optional user configurable attributes available to have more control over writing the data. ‘-append’ , ‘precision’, ‘newline’ are some commonly used attributes.
Example:
>> dlmwrite('dlmexample.txt',data)
Will write the contents of the variable data to the file dlmexample.txt as shown below
1,2,3,4
5,6,7,8
9,10,11,12
Now if we modify our command using different delimiter the file will be updated as:
>> dlmwrite('dlmexample.txt',data,'delimiter',';')
1;2;3;4
5;6;7;8
9;10;11;12
Note that the delimiter is changed to semi-colon.
>> dlmwrite('dlmexample.txt',data,'delimiter','\t')
1   2   3   4
5   6   7   8
9   10  11  12
Now the de limiter is the tab.
dlmwrite('dlmexample.txt',data,'delimiter','\t','precision','%.6f')
1.000000    2.000000    3.000000    4.000000
5.000000    6.000000    7.000000    8.000000
9.000000    10.000000   11.000000   12.000000
The ‘precision’ attribute is used to set the number of significant digits to 6.

dlmread( ) - Import Delimited Numeric Data

This function is used to read a file or a range of numeric data separated by any delimiter to a matrix. The file must contain numeric data only. The Syntax is:
X = dlmread(‘filename, ‘delimiter’, [range])
Delimiter and range are optional. If the delimiter argument is not specified, then the delimiter is inferred from the formatting of the file (consecutive white spaces are treated as a single delimiter). Range is to define the range of data to be read from a file, as explained in the csvread section.
Example:
>> A=dlmread('dlmexample.txt')
A =
     1     2     3     4
     5     6     7     8
     9    10    11    12
To read only 3rd row of the file:
>> A=dlmread('dlmexample.txt','\t', [2 0 2 3])
A =
     9    10    11    12

type( ) - Display contents of file

type is the function to display the contents of a file in the command window. The contents of the file may be numeric or non-numeric. The syntax is:
type ‘filename’

Example:
>> type 'dlmexample.txt'
1.000000  2.000000  3.000000  4.000000
5.000000  6.000000  7.000000  8.000000
9.000000  10.000000 11.000000 12.000000

>> type 'texttest.txt'
Welcome to Electrical Engineering Tutorial

>> type 'test.txt'
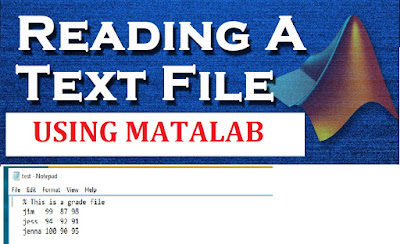
% This is a grade file
     jim 99 87 98
     jess 94 92 91

     jenna 100 90 95

Saturday, July 2, 2016

Working with Text files in MATLAB - Part 1


MATLAB can import text files both interactively and programmatically. Import Tool used to import data interactively. The Import Tool supports text files, including those with the extensions .txt, .dat, .csv, .asc, .tab, and .dlm. Data in these files can be a combination of numeric and nonnumeric text, and can be delimited by one or more characters.
There are many inbuilt functions to import and export data from and to the text files programmatically. Most of the import functions for text files require that each row of data has the same number of columns, and they allow to import a specified a range of data.
We will discuss some of the common functions to work with text files.

textread( ) - Read formatted data from text file

textread is a function which handles many of the problems/tasks of file input. textread is a function that "takes in" the name of a file and "returns" an array of information.
General syntax is
A = textread('filename', ' ', N, ’param’, value, ...)
X = textread('filename') reads numeric data from  the file into a single variable X.
Param and value are optional arguments to configure the output. One common parameter is ‘headerline’. It is used to tell textread to skip the first line of the file (the non-data line). Use the optional argument "'headerlines', number" where number is how many lines to skip.
X = textread('data', 'headerlines', 1);
There are many other types of parameters to configure the output. For the full list refer the Matlab help.
Suppose you wanted to read a file with strings in it as well as numbers. To do this, you must specify the "%format" of each column of data.
[A,B,C, ...] = textread('filename', 'format specifier', N, ’param’, value, ..) reads data from the file into the variables A,B,C,etc.  The type of each return argument is given by the format specifier string.  The number of return arguments must match the number of format specifiers in the FORMAT string.
N is another optimal argument to read a specific number of values to read from the file.  
A = textread('filename', '%d', 1); %  This reads a single integer from the file.

Example:

Consider the file test.txt, whose content is:
            % This is a grade file
            jim 99 87 98
            jess 94 92 91
            jenna 100 90 95
     
To read this file we use:
>> [names, grade1, grade2, grade3] = textread('test.txt', '%s %f %f %f', 'headerlines', 1)
names =
    'jim'
    'jess'
    'jenna'
grade1 =
    99
    94
   100
grade2 =
    87
    92
    90
grade3 =
    98
    91
    95
To read all numeric data from a delimited text file, use a single output argument, empty format string, and use the appropriate delimiter.
Example:
Suppose delimexample.txt contains:
        1,2,3,4
        5,6,7,8
        9,10,11,12

To read the whole matrix into a single variable:
>> [data] = textread('delimexample.txt','','delimiter',',')
data =
     1     2     3     4
     5     6     7     8
     9    10    11    12    

textscan( ) – Read Formatted Data from a Nonrectangular Text File

The textscan function is used to read formatted text file and save data to a cell array. The synatax is similar to the textread function. Here to read multiple data we don’t need to specify the multiple output variables, but the whole data will be stored as a cell array. The syntax is:
C = textscan(FID, 'format specifier')
Other optional arguments are very similar to the textread function.
When textscan reads a specified file or string, it attempts to match the data to the format string. If textscan fails to convert a data field, it stops reading and returns all fields read before the failure.
Example:
Consider the test.txt file in the previous section. To read the file content to a cell array C:
>> fid = fopen ('test.txt', 'r+');
>> C = textscan(fid, '%s %f %f %f', 'headerlines', 1);
>> celldisp(C)
C{1}{1} =
jim
 C{1}{2} =
jess
 C{1}{3} =
 jenna
 C{2} =
    99
    94
   100
C{3} =
    87
    92
    90
C{4} =
    98
    91
    95

The textscan function can be used to read data in a string. The syntax is:
C = textscan(string)